Sunday, July 25, 2010

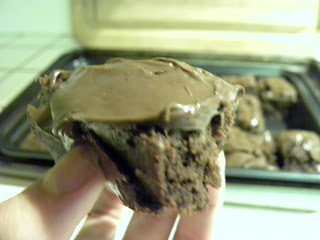
Nutella Chocolate Fudge Brownies

Believe it or not, I've never baked brownies from scrath that didn't end up tasting dry and dull (ie: tasteless). I also have never eaten Nutella before. All of this changed over the weekend. These brownies actually came out of the oven moist with the perfect amount of crunch on the top. The chocolate chips were like a welcome pocket of chocolate bursting from random bites. The brownies actually reminded me of the Mrs. Fields brownies that my sister and I used to convince my grandma to buy us at the mall when we were little girls. What made these even better was that the recipe calls for spreading Nutella over them! I love Nutella. I can say that now. I might start eating it out of the jar or spreading it randomly on cookies and crackers. These brownies really were so good that you don't need the Nutella spread. They can hold their own. If tomorrow wasn't Monday, I would bake up another batch and eat them at my pleasing. But I can't stroll into work with chocolate crumbs around my mouth and my clothes not fitting. If only..

Nutella Chocolate Fudge Brownies
Recipe from Bunny's Warm Oven
4 - one ounce squares unsweetened chocolate
1 cup unsalted butter (2 sticks)
2 1/2 cups sugar
4 large eggs
1 Tablespoons pure vanilla
1/8 teaspoon salt
1 cup unbleached white flour
1 cup chocolate chips, optional (recommended)
1/2 - 1 whole jar of Nutella

Preheat oven to 350 degrees F. Butter or spray and flour a 9 X 13 inch glass or non-stick baking pan.
Chop unsweetened chocolate and melt chocolate and butter in a large saucepan over medium heat. Do not burn. Remove from heat.
Using a wooden spoon or spatula, add sugar and stir until well mixed.
Add eggs, vanilla and salt and beat well with a wooden spoon.
Fold in flour and mix just until smooth. Do not over mix. Fold in chocolate chips.
Pour into prepared pan.
Bake for 35-40 minutes or until knife comes out clean.
Cool for about 15 minutes, then spread desired amount of Nutella over warm brownies.
Cool completely before cutting into squares.

Don't you hate waiting for the cooling process to be complete?

Saturday, July 17, 2010

Mission: Chocolate

I had a craving this evening when I got home from work. Actually, craving is putting it lightly. It was more of an intense and urgent desire. It was a need for chocolate. Something triggered in a section of my brain as I sat at my desk waiting for the clock to strike 6:00 and my boss to sign my pay check. I tried to be good and soothe my craving with some handfuls of Special K Chocolate Delight cereal. But I'm only human. A human girl. A human girl who needed a serious chocolate fix. I made the decision to indulge myself with this chocolate cobbler. The best way to describe this is a large chocolate molten cake. The chocolate batter is spread in the baking dish, a mixture of sugars and cocoa powder is sprinkled over it, and then it's topped off with hot water before being baked. The original recipe doesn't call for chocolate chips, but I couldn't resist adding some to the batter. As soon as you cut into the cakey top of this cobbler, the perfect amount of rich chocolate oozes out for your delight. I'm telling you.. this is a dessert that was created to be served and melted into vanilla ice cream. Any flavor ice cream would be delicious (I'm sure), but there's something about vanilla that always seems to compliment certain flavors. After eating a two bowl(s) and vegging out on the couch rubbing my stomach with what I'm sure was a silly grin on my face, I felt quite satisfied. I've always been a fan of giving into cravings (seriously guys, whats a better word for this?), especially when it comes to desserts.
Another positive: this was so easy to bake. Honestly. After washing the 6 or 7 dishes that I used and wiping down the rouge cocoa powder from the counter, I thought to myself how weird/nice it was having such an easy clean up. Usually when I bake or cook anything, the kitchen looks like a twister blew through it. Not this time though. The cobbler was in the oven and everything was clean in under twenty minutes. Can you imagine?

Chocolate Cobbler
Adapted (if you can call it that..) from Tasty Kitchen

1 cup All-purpose Flour
7 Tablespoons Cocoa Powder, Divided
2 teaspoons Baking Powder
¼ teaspoons Salt
1-¼ cup Sugar, Divided
⅓ cups Melted Butter
1-½ teaspoon Vanilla Extract
½ cups Light Brown Sugar, Packed
1-½ cup Hot Tap Water
½ cups Milk
1 cup chocolate chips (I used milk chocolate)

1. Preheat oven to 350 degrees.
2. First stir together the flour, baking powder, salt, 3 tablespoons of the cocoa, and 3/4 cup of the white sugar. Reserve the remaining cocoa and sugar.
3. Stir in the milk, melted butter, and vanilla to the flour mixture. Mix until smooth. Gently stir in chocolate chips.
4. Pour the mixture into an ungreased 8-inch baking dish.
5. In a separate small bowl, mix the remaining white sugar (1/2 cup), the brown sugar, and remaining 4 tablespoons of cocoa. Sprinkle this mixture evenly over the batter.
6. Pour the hot tap water over all. DO NOT STIR (no matter how tempting!)
7. Bake for about 40 minutes or until the center is set.
8. Let stand for a few minutes if you can hold yourself back.

Friday, July 9, 2010

Taco Melts

I'm usually more of a dessert than main course type gal, but I've had my eye on this Pillsbury recipe for a few months now. It's basically a meal consisting of ground beef, refigerated biscuits, and taco seasoning mix. Does it get any easier than that? The biscuit wraps are tender and flaky and the filling is packed with flavor and suprisingly (delightfully) spicy. It only took about 35 minutes from beginning to end and if you already  have some pre-cooked ground beef on hand, it will be finished even quicker! Just add the seasoning and salsa. Now, when I first pulled these out of the oven  I was a little apprehensive from the look of them. They looked nothing like the neat and crispy biscuit melts posted with the recipe on the website. Instead, they were more pale, plump, and all over the place. Once I opened that baby up though, I knew that I had done good. I'm not the only fan of this recipe, my fellow diners enjoyed these as well. Even after dinner was finished and the dishes were cleaned and the reruns of USA television shows were on, I continued to get compliments. Of course, I have to give 90% of the credit to that cute pillsbury dough boy and his buttermilk biscuits.

Pillsbury Grands! Taco Melts
1 package Old El Paso taco seasoning mix
2/3 cup water
1/2 cup chunky salsa
1 lb lean ground beef (at least 80%) cooked, drained
1 can (16.3 oz) Pillsbury refigerated biscuits (any variety)
1 cup shredded mexican cheese blend

1. Heat oven to 375 degrees. Line a cookie sheet with foil and grease.
2. In medium saucepan, cook taco seasoning mix, water, 1/2 cup of the salsa and cooked ground beef until thickened and water is absorbed.
3. Press each biscuit into 6-inch round. Fill with taco mixture and 1 tablespoon cheese. Fold dough over filling and press to seal. Place on greased cookie sheet.
4. Bake 10 to 12 minutes or until golden brown.

And since I do love treats, I topped off my night with vanilla bean ice cream, hot fudge, and M&Ms. A little dessert never hurt a girl.

Monday, July 5, 2010

Red, White, and Blue

I don't know about you, but to me it doesn't quite feel like summer until we've had the Fourth of July festivities. Something about the barbequing, the drinks, the warm night, and the family getting together really does it for me. Not to mention the fireworks! Oh, and I love any excuse to bake! Even though I don't really need one to begin with.. at least this way I don't eat all the goods by myself (which I've been known to do..) I decided that I would bake festive vanilla cupcakes frosted with red, white, and blue buttercream and some fried strawberry pies. The fried strawberry pies were sort of a last minute thing, I originally wanted to bake individual cherry pies but time literally flew by that day and I already had the ingredients for the strawberry pies and they were so simple to assemble. All it is is strawberries, cornstarch, sugar, and *gasp* refirgerated pie crust! In the end, I had so much strawberry filling left over that I was able to cone out the middle of each cupcake, fill them, and reassemble before frosting them with this rich vanilla bean buttercream. I have to say, the strawberry mixture along with the vanilla cupcake was absolutley DELICIOUS. You see that? You see what I did there? I put it in capital letters to help you understand the explosion of taste that was going on in my mouth with every bite.  I might never eat another cupcake again unless its filled with this fruity goodness (okay.. that might be a little lie so don't hold me to it!).
Fried Strawberry Pies
Courtesy of Southern Living
2 cups fresh strawberries, mashed
3/4 cup sugar
1/4 cup cornstarch
1 (15-ounce) package refrigerated piecrusts
Vegetable oil
Powdered sugar

1. Combine first 3 ingredients in a saucepan. Bring strawberry mixture to a boil over medium heat. Cook, stirring constantly until thickened. Let cool completely.
2. Roll 1 piecrust to press out fold lines; cut into 9 circles with a 3-inch round cutter. Roll circles to 3 1/2-inch diameter; moisten edges with water (*I used egg wash*). Spoon 2 teaspoons strawberry mixture in the center of each circle; fold over, pressing edges with fork to seal. Repeat with remaining piecrust and strawberry mixture.
3. Place pies in a single layer on a baking sheet, and freeze at least 1 hour.
4. Pour oil to a depth of 1 inch into a large heavy skillet; heat to 350°.
5. Fry pies, in batches, 1-2 minute on each side or until golden. Drain on paper towels; sprinkle with powdered sugar.

I know, I know.. The red came out very pink, but I ran out of food coloring! It's American enough for me though!
MmMmMm...........strawberry filling!
Vanilla Cupcakes
1/2 cup unsalted butter, room temperature
2/3 cup granulated white sugar
3 large eggs
1 teaspoon pure vanilla extract
Zest of 1 large lemon
1 1/2 cups all purpose flour
1 1/2 teaspoons baking powder
1/4 teaspoon salt
1/4 cup cold milk

1. Preheat oven to 350 degrees F and line 12 muffin cups with paper liners.
2. In the bowl of your electric mixer, or with a hand mixer, beat the butter and sugar until light and fluffy. Add the eggs, one at a time, beating well after each addition. Beat in the vanilla extract and lemon zest.
3. In a separate bowl whisk together the flour, baking powder, and salt. With the mixer on low speed, alternately add the flour mixture and milk, in three additions, beginning and ending with the flour. Scrape down the sides of the bowl as needed.
5. Evenly fill the muffin cups with the batter and bake for about 18-20 minutes or until nicely browned and a toothpick inserted into a cupcake comes out clean. Remove from oven and place on a wire rack to cool. Once the cupcakes have completely cooled, frost with icing.

Easy Vanilla Bean Buttercream
Courtesy of Cook's Illustrated
2½ sticks unsalted butter, softened
1 vanilla bean, halved lengthwise
2½ cups confectioners’ sugar Pinch salt
1 teaspoon vanilla extract
2 Tablespoons heavy cream

1. In a standing mixer fitted with the whisk attachment, beat the butter at medium-high speed until smooth, about 20 seconds.
2. Using a paring knife, scrape seeds from vanilla bean into butter and beat mixture at medium-high speed to combine, about 15 seconds.
3. Add confectioners’ sugar and salt; beat at medium-low speed until most of the sugar is moistened, about 1 minute. Scrape down the bowl and beat at medium speed until mixture is fully incorporated, about 30 seconds; scrape bowl, add vanilla and heavy cream, and beat at medium speed until incorporated, about 20 seconds, then increase speed to medium-high and beat until light and fluffy, about 4 minutes, scraping down bowl once or twice.

(this buttercream is so good, I could eat it from the bowl!)